Posted on

Marquee Linings explained

Decoding Marquee Lining Terminology: A Guide to Interior Elegance

Understanding the terminology associated with marquee linings is generally straightforward, with a few industry-specific nuances to consider:
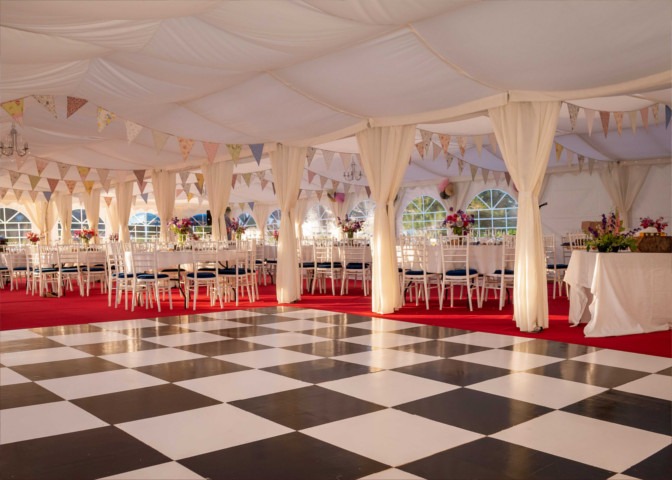
  1. Roof Linings:
    • Flat or Shaped: Follows the interior space in the roof, a popular and contemporary choice.
    • Pleated: Vertically gathered material, fashionable in the 90s and 2000s.
    • Rouched: Horizontally tucked linings, trendy in the 80s and 90s.
  2. Eave Linings:
    • Swags: Gathered material, a favorite for weddings, often in ivory but available in various colors.
    • Flat Pelmet: A flat 10cm drop around the marquee, commonly paired with flat or shaped linings.
    • Gathered Pelmet: Similar to a flat pelmet but with a slight pleat, more popular in the 90s.
    • Scalloped Pelmet with Gold Tassel Fringe: Traditionally associated with rouched linings, now considered out of fashion.
  3. Curtain Linings:
    • Used to conceal metal legs; they essentially act as leg covers and typically do not cover window panels. Professional hirers or suppliers avoid linings covering window panels due to the pattern shining through, which detracts from a polished finish.
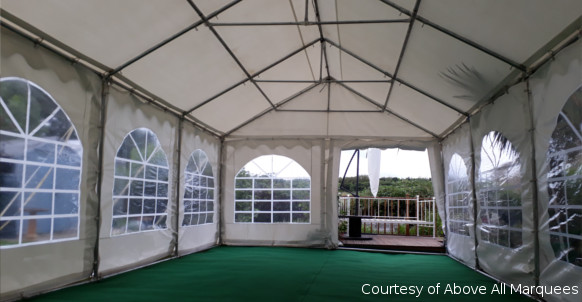
  4. Wall Linings:
    • Not depicted in the photograph due to the use of a window. These linings hide wall panels and are placed on the interior to match the marquee’s aesthetic. While basic ranges may position walls only at the ends, advanced commercial marquees allow for wall panels anywhere inside.

For a personalized touch to your event, we are ready to provide tailored advice. Simply contact us with details about your event, such as the type, available space, number of guests, and site diagrams or photographs, and we will gladly assist you in making informed choices.

If you wish to use or quote any part of this article, kindly reach out to us for permission or licensing.

Posted on

Marquee dance floors

Marquee ivory flat linings
Black and white dance floor


Deciding on Dance Floors for Your Marquee: Exploring Options

The cost of hiring a marquee typically ranges between one-third and half of the purchase price. Consequently, if you anticipate using a marquee more than once, purchasing may prove to be a more economical choice than hiring. However, dance floors and furniture differ in their hire charges, often amounting to around a tenth of the purchase price. Additionally, dance floors are commonly heavier than the marquees they occupy, making hiring a popular and practical solution.

Dance floors come in three common finishes: plain wooden (usually stained plywood), parquet (interlocking wooden blocks), or black & white (square acrylic panels akin to a chessboard).

For those who already own their marquee, here are some considerations:

  1. Hiring a Dance Floor:
    • Economically, hiring is more viable unless you plan to use the dance floor 10 or more times.
    • Most hire companies, whether specialized in furniture or marquees, typically handle the setup and removal of the dance floor, a convenience given their considerable weight.
    • Dance floor boards can occupy more storage space than the marquee itself, making hiring a practical storage solution.
  2. Buying a Dance Floor:
    • Information on reputable dance floor manufacturers, widely used by the marquee hire industry, can be provided upon request. These manufacturers offer durable and reliable dance floors requiring minimal maintenance.
    • It’s advisable to steer clear of cheap plastic interlocking tiles, as they rarely achieve a pleasing aesthetic and may not withstand the rigors that dance floors face. Quality comes at a price, making this the more expensive option.
  3. Making a Dance Floor:
    • Crafting a standard wooden dance floor is a straightforward project. Utilize 18mm plywood with battens securely screwed on the back, and use clips or screws to secure each panel.
    • Staining the plywood with wood stain or painting allows for customization of the finish.
    • Consider cutting large boards in half (e.g., 8×4 down to 8×2) for ease of transport and storage.
    • Costing the project in advance is essential; while buying plywood from a wholesaler is competitive, purchasing a new boarded tent floor may be more economical if buying from retail stores like B & Q.

When planning your event and considering a dance floor for your marquee, we are ready to provide personalized advice. Contact us with event details such as the type of event, available space, number of guests, and site diagrams or photographs, and we will gladly guide you through your options.

For any usage or quoting of parts of this article, please reach out to us for permission or licensing.

Posted on

How to get power to your marquee


Powering a Marquee: Different Approaches

When it comes to supplying power to a marquee, there are generally three methods to consider:

1. Extension Leads:

  • Check the extension lead’s maximum loading capacity (typically 3KW) to avoid overloading.
  • Tidy up the extension lead by securing excess cable to the eaves rail of the marquee using cable ties.
  • Avoid running extension leads in areas where tripping hazards may occur. Ideally, run them out of the side of the marquee above head height, securing them to a fence or hedge and then down to the house.
  • If using multiple extension leads, plug them into different circuits of the house.
  • If the marquee is a significant distance from an available power source (30m+), consider employing an electrician for a temporary supply or using a generator.
  • Ensure any electrical supply is protected by earth leakage circuit breakers to guard against accidental damage.

2. Temporary Circuits (Electrician Required):

  • Engage a certified electrician registered for Part P.
  • Confirm the power output of the circuit to ensure it meets the marquee’s power requirements, considering caterers, entertainment, bar, and lighting.
  • Specify that the power will terminate with standard 13amp sockets in the marquee.
  • Ask the electrician to run the cable in a suitable location to prevent trip hazards.
  • Like with extension leads, ensure any electricity supply is protected by earth leakage circuit breakers.

3. Generators:

  • Opt for ‘super-silent’ generators for minimal noise disruption.
  • Consult the generator hire company to determine the appropriate size based on your total power requirements.
  • Confirm that the generator hire includes cabling to the marquee with termination in standard 13amp sockets.
  • Position the generator at a convenient distance from the marquee.
  • Have spare fuel (usually diesel) available, and ensure the tank is full before the event starts.
  • As with other power sources, ensure any electricity supply is protected by earth leakage circuit breakers.

For personalized advice tailored to your event, feel free to contact us with event details such as type, available space, number of guests, and site diagrams or photographs. We are here to guide you through the options.

If you intend to use or quote any portion of this article, kindly reach out to us for permission or licensing.

Posted on

How to connect marquees using a gutter

Three 6x12m marquees guttered side to side


Understanding Marquee Gutters:

In the realm of marquees, gutters take the form of PVC strips adorned with eyelets on each side, typically measuring 30 to 60cm in width. Ensuring the gutter extends at least 1 meter beyond the marquee join is essential, and having additional length proves advantageous in preventing the ground beneath the marquee from succumbing to excessive moisture.

Attempting to extend a gutter by joining two separate pieces is not a straightforward task and requires specialized PVC welding equipment, a capability integral to the production of our marquee gutters.

Affixing guttering to the marquee involves the use of cable ties. It is crucial to avoid the use of bungee loops for guttering, as they may succumb to the weight of water, causing the gutter to sag and potentially leading to calamitous outcomes during your event. If your gutter purchase includes bungee loops, it is advisable to question the expertise and competence of your supplier.

Note: On the flip side, the use of cable ties for connecting exterior PVC components, such as roof and side panels, is discouraged. Bungee loops allow for flexibility in material during strong winds, thereby mitigating strain on the eyelets.

Key Considerations When Installing a Marquee Gutter:

  1. Ensure the gutter is devoid of kinks.
  2. Verify a consistent fall over the marquee’s length, devoid of any dips.
  3. Always conduct a hosepipe test to ascertain proper water flow, ensuring it exits the gutter without pooling.

Steps for Guttering Between Two Marquees:

  1. Raise both marquees, maintaining a 10cm gap between them. Postpone the installation of flooring, lining, or lighting until the marquee join is weatherproof.
  2. Thread the gutter between pairs of legs along the join, allowing an equal overhang at each end.
  3. Initiate cable tying from the middle of one marquee towards the eave rail, drawing the gutter taut towards one side. Progress to the end and replicate for the opposite side before shifting to the second marquee.
  4. For side-by-side marquees, adjust cable tie tension less towards each end on level ground or uniformly on sloped terrain.
  5. Repeat the process for the second marquee, ensuring a taut gutter to prevent kinks.
  6. Validate the installation by directing a hosepipe onto one marquee’s roof, ensuring effective water drainage.

Additional Considerations:

  • For end-to-end marquee arrangements, securely fasten legs together, drape the gutter over the join, and tension it down on both sides to stave off water ingress.
  • When weathering the end of one marquee to the side of another, construct an eave rail with ropes, securing a second rope from the middle to the apex to prevent sagging.
  • Address potential kinks at the gutter’s end by strategic tucking and secure fastening with a rope.
  • With practice, the process of weathering marquees together becomes second nature.

For tailored event advice, connect with us, providing pertinent event details. If you plan to use or quote segments of this article, kindly seek permission or licensing from us.

For personalized event advice, contact us with event details. If you wish to use or quote any part of this article, please seek permission or licensing from us.

Posted on

How to heat your marquee


As the seasons shift into spring and summer, heating in marquees is generally needed only to take off the evening chill. However, as autumn and winter set in, ensuring a warm marquee is essential for a successful event. Here are some dos and don’ts to consider:


Do:

Use a Heater with a Powerful Fan (Indirect Heaters are Best):

Indirect heaters, with their robust fans, are particularly effective.

Test Heating in Advance:

Test the heating system several days before the event, at the same time of day, to ensure it works efficiently and is adequate for the space.

Start Heating Well Before Guests Arrive in Winter:

In winter, have the heating on for at least an hour before guests arrive. A warm welcome upon arrival sets the tone for the entire function.

Direct Heaters Toward the Entrance:

Aim the heating ducts towards the entrance, creating a welcoming wall of warmth for guests upon entry.

Fit Carbon Monoxide Testers:

Install carbon monoxide testers, placing one for every heater, to ensure safety.


Don’t:

Use Inadequate Heaters:

Avoid halogen heaters, cabinet heaters, or other infra-red heaters without fans, as they may lack the power required for larger marquees.

Place Objects Near Heaters:

Keep anything from being close to or touching a heater, prioritizing safety.

Opt for LPG Blower/Space Heaters:

While blower or space heaters can heat large areas quickly, their use is discouraged due to potential risks:

They require well-ventilated spaces, and sealed marquees can pose a risk of ‘re-burning’ air, leading to carbon monoxide production.

The naked flame inside, protected only by a grill, may not be safe, especially for small children.

Overlook Carbon Monoxide Risks:

Understand the risks associated with certain heaters, especially those involving open flames.


Heating Options:

Ducted Heaters:

Require gas bottles and sit outside the marquee, ducting warm air into the space. Generally include thermostats for ease of use.

Indirect Heaters:

Powered by oil/diesel, these heaters are effective in rapidly heating large spaces. Similar to ducted heaters, they sit outside the marquee with warm air ducted in.

Marquee heaters for sale
Indirect marquee diesel heater

Considerations for Heater Choice:

Ducted heaters can be expensive, and hiring is often recommended.

Indirect heaters, while effective, may warrant purchasing if planning to use them frequently.

For personalized event advice or more information, please contact us with details about your event. If you intend to use or quote any part of this article, please reach out to us for permission or licensing.

Posted on

How to connect your marquee to a building

Connecting a marquee to a house typically involves two approaches:

Butting the Marquee Directly Up to the House:

  1. Generally feasible when house doors open to the marquee end rather than the side, beneficial for weather resistance and structural considerations.
  2. Ensure a snug fit between the marquee and the house, especially near overhanging guttering.
  3. Leave off the end panels facing the house and position them on either side, filling any gaps between the marquee corners and the house.
  4. This arrangement enhances the event atmosphere by allowing house windows to offer a direct view into the marquee.
  5. For a polished appearance and improved insulation, consider lifting the scalloped edge of the roof facing the house slightly.

Using a Walkway:

  1. Our modular walkways come in 2x2m, 2x4m, or 2x6m structures, but improvising with wood or PVC is also an option.
  2. Keep the walkway as short as possible if the event spans both the house and the marquee to encourage seamless flow between the two spaces.
  3. Consider heating provisions for the walkway if needed.

For personalized event advice, feel free to contact us with details about your event, including the type, available space, guest count, and site diagrams or photographs. We’re ready to provide tailored guidance.

Should you wish to use or quote any portion of this article, kindly reach out to us for permission or licensing.

Posted on

How to choose were to put up your marquee

Not everyone is blessed with the luxury of perfectly manicured bowling green lawns. So, when selecting the ideal spot for your marquee, consider these essential factors:

Terrain Considerations:

  1. While a marquee doesn’t demand absolute flatness, a level surface certainly facilitates the setup. To assess the ground, experiment by placing garden furniture on the intended location.
  2. A gentle slope is manageable, but excessively bumpy and uneven landscapes might pose challenges. Don’t be tempted to improvise with dining tables on a slope, as it can result in chairs at awkward heights.
  3. Avoid waterlogged areas, especially during winter events.
  4. Our marquees are versatile enough to be erected on hard standing or a mix of hard and soft surfaces, as long as there’s not a significant height difference.

Choosing a Garden Location:

  1. Marquees typically come in square or rectangular shapes, so factor this in when planning their placement.
  2. Incorporating flower beds, small trees, or bushes within the marquee can add charm, but be mindful that they will reduce the marquee’s capacity.
  3. During winter, it’s wise to position the marquee close to or connected to the house for convenient access.
  4. Consider having two layout options—one for stormy weather with the marquee near the house, and another for fair weather with the marquee set back.
  5. For a cosy gathering in a vast garden, position the marquee across the garden, creating a small courtyard in front to foster intimacy and prevent the feeling of being lost in a large space.

For personalized event insights, reach out with event details such as type, available space, guest count, and site diagrams or photographs. We’re here to provide tailored advice.

If you wish to use or quote any portion of this article, kindly contact us for permission or licensing.

Posted on

How to secure marquees on hard surfaces

Portland marquees function like robust boxes, making them suitable for setup on hard surfaces such as concrete, tarmac or paving. However, proper anchoring is crucial to ensure stability. While tie downs are the conventional method, they may not be ideal for hard surfaces. Here are alternative anchoring methods:

  1. Bolting: On certain hard surfaces, bolting the marquee to the ground is an option. The footplates come with pre-existing holes for this purpose. For increased strength, consider drilling eye-bolt fixings 1-2 meters away from the marquee sides and use straps similar to those found in tie-down kits.
  2. Heavy Weights: Strapping heavy weights directly to the marquee is a popular and effective anchoring method on hard surfaces. Various weight options include:
    • Water butts: Light and portable, but avoid long-term use due to the risk of standing water and legionnaires disease. Access to a hose pipe on-site is essential.
    • Concrete blocks or other dense materials: Excellent for stability but can be cumbersome to move.
    • Vehicles: For short-term setups (e.g., exhibitions), marquees can be strapped to vehicles. Ensure a secure attachment that won’t damage the vehicle.

Combining methods is also an option, such as using tie downs to a nearby grass area on one side and heavy weights on another. It’s crucial to note that the metal weights commonly used for gazebos are insufficient for anchoring commercial marquees.

Every site is unique, and the responsibility for adequate anchoring lies with those setting up the marquee. Customized advice for your event is available by contacting us with event details, including the type of event, available space, number of guests, and site diagrams/photographs.

For any use or quotation of this article, please reach out to us for permission or licensing.

Posted on

Why our 4m wide premier marquees are so strong

Our premier Portland Marquees surpass the industry standard as well as our own party tent and luxury ranges in terms of strength. The robustness is attributed to the incorporation of features commonly found in 6-meter wide structures:

  1. Vertical and Horizontal Roof Braces: The inclusion of both vertical and horizontal roof braces significantly enhances the strength of the roof, setting our marquees apart.
  2. Intermediate Purlins: Strategically positioned intermediate purlins along each side, halfway down the roof, provide additional support, reinforcing the marquee’s overall structure.
  3. Wind Resistant End Panels: Our wind-resistant 2-meter end panels, covered in detail in a separate article, contribute to the marquee’s stability in challenging weather conditions.
  4. Envelope Style Roof: The unique envelope-style roof adds to the distinctive features of our marquees, ensuring durability and reliability.
  5. Automatic Inclusion of Groundbars: Groundbars are automatically included, contributing to the overall stability of the structure.
  6. Gable Uprights: A gable upright at each end facilitates the use of interchangeable side panels, offering flexibility in design and functionality.
  7. High-Quality Material: All roofs and sides are crafted from a reliable 500gsm rip-stop PVC, ensuring longevity and resilience.
  8. Triangular Structure: Leveraging the strength of the triangle, the additional roof braces create a robust triangular structure, providing substantial strength to the marquee frame.

Collectively, these features position our 4m commercial marquees as the most durable and heavy-duty structures in their class globally.


For personalized event advice, feel free to contact us with details about your event, including the type of event, available space, number of guests, and site diagrams/photographs. We are committed to offering tailored guidance to meet your specific needs.

If you intend to use or quote any part of this article, kindly reach out to us for permission or licensing.

Posted on

6m x 4m marquees VS 4m x 6m Marquees

6x4m marquees vs 4x6m marquees

In the realm of marquees, the initial specification typically revolves around the width of the structure. For instance, a marquee measuring 6 meters in width and 12 meters in length would be denoted as 6x12m.

However, there exists a common source of confusion between 4x6m and 6x4m marquees. The key distinction lies in the width of the A-frame, as illustrated in the diagram. A marquee employing 4m wide A-frames with a length of three 2m bays is labelled as 4x6m (depicted on the left in the diagram). Conversely, a marquee utilizing 6m wide A-frames and spanning two 2m bays is referred to as 6x4m (shown on the right in the diagram).

While the 4x6m model tends to be the more popular and cost-effective choice for this size, the 6x4m variant may be more suitable in certain scenarios. For instance, when butting up to a house it is advisable to use a 6x4m marquee if the area is only 4m deep and 6m wide. This ensures that the flat gable aligns with a house for weathering purposes, allowing water to run off to the side without any rail obstruction to door openings within the marquee.


We are always eager to provide personalized advice for your event. Feel free to reach out to us with details about your event, including the type of event, available space, the number of guests, and any diagrams or photographs of the site. We will gladly offer guidance on your options.

If you wish to utilize or quote any part of this article, kindly contact us for permission or licensing.